Classic SAAB 900
1987–1993 SPG PANEL KIT INSTALLATION GUIDE
Written by Rob
Marsh
August 2007

Article intro:
Ok, you’d like to embark on one of the most visually rewarding, yet least fun jobs on a Classic 900 vehicle: Installing the SPG body kit. It’s not overly complex, but it is not an easy, nor a quick job. This install will help you mount the panels in a way that will give you a result very similar to factory fitment. In addition to the factory fitment installation instructions, some alternate methods are included that will also work. Don’t expect to finish the job in an afternoon. Allow a large block of time, and don’t rush, you’ll soon get frustrated.
Including prep, painting, and mounting, it took me about 3+ full days to complete, and the results are quite nice. I’d recommend that you print off and read the entire article before you get started. It’s not a job that you can easily jump right into without proper preparation and understanding. Also, please read carefully!
This tutorial was photographed and written around the install on my ’92 900T 3-door during June of 2007 over the course of 4 days. It is useful for cars back to 1979, but is specific for 1987+ C900 models including the 2 door, 3 door and convertible.
NOTE: On a C900 convertible and 2 door sedan, all panels will fit properly EXCEPT the rear bumper extension panels. The 3 door hatchback SPG rear bumper extensions panels will not fit on a convertible or 2 door sedan. They are of a significantly different length among other differences. All other panels from a 3dr will fit.
A bit about me:
My name is Rob Marsh, and I live in Vancouver, British Columbia, Canada. I’m not a SAAB employee or an expert of the classic 900 or the SPG kit. I am simply an enthusiast with some experience. All this info is what has worked best for me, and what I consider to be quite in-depth info on my install and alternate methods of install. This isn’t gospel, it’s just a guide. I can be contacted for questions and general input, Q&A, and comments at rob1986spg@yahoo.ca You can also send me a private message on SaabCentral at www.saabcentral.com my user name is “RM ’86 SPG”
An intro on the 1987-1993
SPG kit and how it all comes together:
The “SPG” body kit, also known as the “Aero kit” consists of 10 body panels and a front lip spoiler. . Later 900 models are already fitted with the front lip spoiler.
On 1989 and up SPG models, larger black fender flares were part of the kit as well
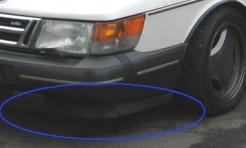
The 4 panels that are directly attached to the sides of the front and rear bumpers are quite similar in position and mounting as the small non-SPG variants. These 4 bumper “extension” panels sit on a “locking” rail that is the same on SPG and non-SPG cars from 1987 up. I addition to the “locking” rail used on all bumper extension panels, they are held in place by the use of 1 rubber or plastic “flap” per panel that bolts to both the bottom edge of the panel itself as well as into the wheel well of the car. These 4 plastic/rubber flaps are not interchangeable on SPG and non-SPG panels. All 4 bumper extension panels on both SPG and non-SPG models are fitted with a thin chrome colored décor strip. All of these small strips mount in the same way, but they are also not interchangeable. The SPG bumper extension panels have a slightly longer chrome strip on both the front and the rear. The front lip spoiler is mounted to the bottom of the front bumper valance and lines up with the front bottom corners of the front bumper extension panels. Newer models are already fitted with this lip as part of a 3-piece front spoiler. The photo below is of the 3-piece spoiler mentioned.
The 10 panels are fitted with 2 very different types of mounting rails. The 4 “bumper extension” panels are held on with use of a “sliding” or “locking” rail system that is the same on non-SPG models. The 6 panels between the front and rear wheels are held on with a “snap-together” type of rail. These particular rails are called “attaching profiles” by SAAB.
The “center 6” panels are fitted between the front and rear wheels, 3 on each side. These panels are held in place by means of a very specific set of 6 aluminum “rails”. These rails are attached directly to the body of the car by means of either direct drilling into the sheet metal or by use of a plastic grommet acting as a screw anchor. This anchor is the original SAAB method of installation and fits into a square-shaped hole in the body of the car. If your car is 1991 or newer, your car is already pre-drilled for the “center 6” panels behind the standard non-SPG side molding. If your car is pre-drilled, you must use plastic grommets to mount the rails, as the holes are a 7mm square in shape. These aluminum rails were originally buffered or shimmed against the paintwork by thin black plastic strips that act as a proper spacing tool as well as protection against abrasion and corrosion caused by metal-to-paint contact. The aluminum rails fitted directly to the body of the car mate with the aluminum rails glued and clipped to the inside of the SPG panel itself. When positioned and forced together correctly, they “snap” together creating a very strong link holding the SPG panel in place. You will find that making this “link” can be very difficult and frustrating at times. It is not an easy task to get particular panels to snap together correctly. (More on that later as well) The 4 body panels fitted between the door and front/rear wheel wells are held in place by means of the rail as well as rubber mounting flaps similar to those used on the front and rear bumper extension panels. All 4 of these above mentioned panels are also fitted with both a small flexible metal “tab” to holds the top corner nearest the wheel well of the panel against the body of the car. This is done by the tab extending around inside the wheel well and held in place with a single small screw. (You’ll see photos later) In addition to the rail, the flap, and the tab, these 4 panels fitted against the wheel wells are also secured at the bottom corner by means of a sheet metal bolt. The 2 panels between the door and the rear wheel wells are a single bolt through a hole in the panel itself. The 2 panels between the front wheel well and the front door are held in place at the bottom by means of special SAAB metal retaining clips, one per side. (More info later) The large SPG panels fitted to the doors are held in place by the long rails in addition to 6 large rivets at the bottom of each door. Generally speaking, the large SPG door panels are the easiest to mount of the “center 6”
There is a small list at the bottom of this article with SAAB part numbers for some specific parts required for this install.
Basic intro on A, B, and
C panel removal:
The “center 6” panels can be removed from the rails during install if required or from a donor car by first removing all other hardware and leaving the panels solely on the rails. Using the palm of your hand(s) firmly and sharply hit the bottom rounded portion up and out towards yourself. The panel should pop right off the rail. The door panels can be simply slid on and off the rail with the door open. NOTE: Pulling the panel straight outwards off the rail will damage and deform the panel itself around the integrated rail on the backside. This deformation will be visible when you go to re-mount them.
Basic intro on Rear and
Front Extension Panel removal (SPG and non-SPG):
The front bumper extension panels of both SPG and non-SPG cars are held on by several ways. First, there is a single finely threaded bolt holding the front lower corner to the front bumper valence. There is also a very small torx screw holding the top corner to the inside edge of the wheel well. There is the rubber flap, and the locking rail the panel sits on. After you’ve removed all other hardware from the front extension panel, slide the front extension panel rearwards about 20mm away from the bumper and it should pop straight out.
The rear bumper extension panels of both SPG and non-SPG cars are also held on in several ways. First, there is a single screw and speed nut holding the rear lower corner to the bottom of the rear bumper cover. Similar to the front bumper extension, there is also a very small torx screw holding the top corner to the inside edge of the wheel well. There is the rubber flap, and the locking rail the panel sits on. After you’ve removed all other hardware from the rear extension panel, slide the panel forwards away form the bumper about 20mm, and it should pop straight out.
Throughout the remainder
of the article the panels will be referred to as “A”, “B”, “C”, “front
extension”, and “rear extension”
The term “center 6” is used a fair amount in this article. “Center 6” refers to the 6 panels fitted between the front and rear wheels.
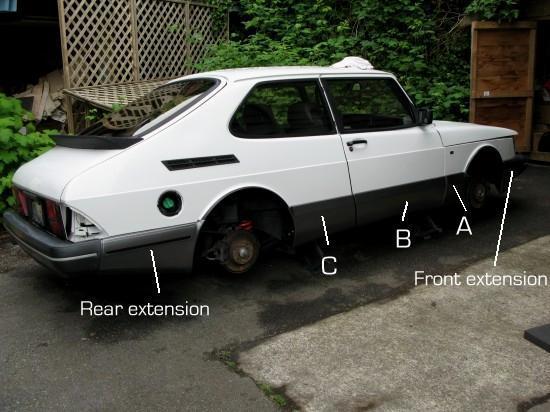
Section A: Materials and hardware
required:
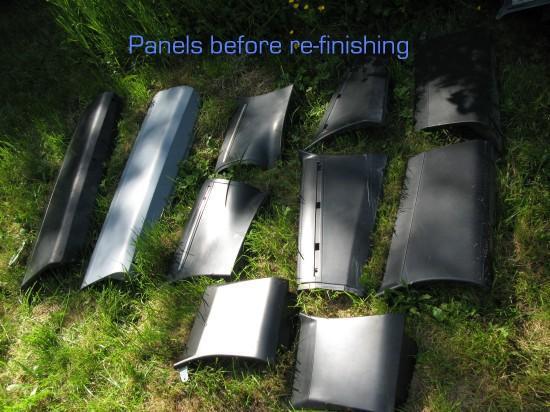
The actual panel set:
You’ll also need the small 4 chrome décor strips. (Some not pictured)
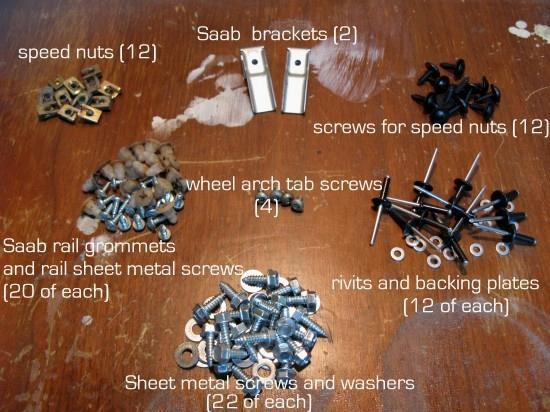
The basic hardware:
Rubber mounting “flaps”, rails and gaskets:
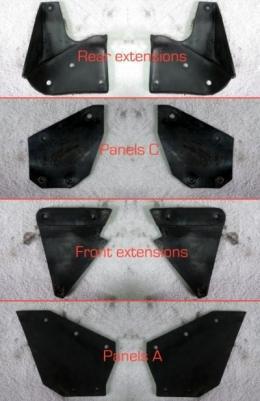
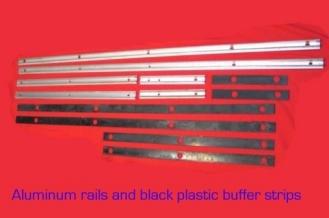
Weather-stripping gaskets
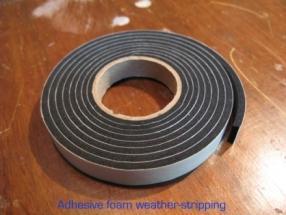
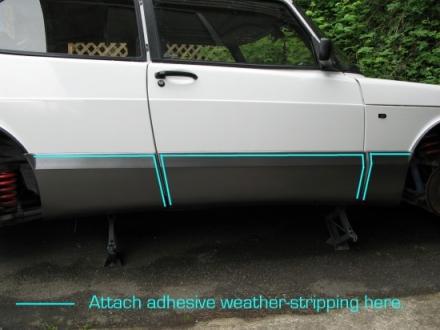
The majority of used SPG panels have some form of damaged or missing original top weather-stripping. Some can be replaced with adhesive foam stripping. The product pictured below is made my ProForm, and is fairly widely available at specialty auto supply stores. It’s usually kept with the body shop supplies. It is best used on the “center 6” panels as there is a significant surface to mount into on the backside of the panel. You should make an effort to use the original Saab weather-stripping on the 4 bumper extension panels. This is because there is nearly no surface to attach the adhesive type.
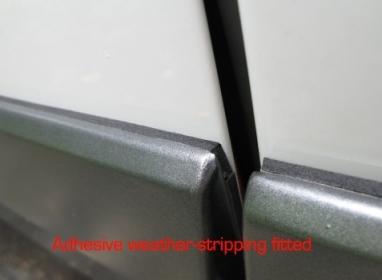
All the old remnants of weather stripping need to be completely scraped off. The area should be cleaned with methyl hydrate or some sort of other cleaning alcohol. The adhesive foam should be attached on the tops and the sides of the center 6 panels that will be directly against the body of the car. A photo below shows in detail where the adhesive tape should be adhered.
I chose to re-weather-strip all “center 6” of the panels on my setup. I was able to salvage some good original weather-stripping off these panels that was transplanted onto bumper extensions that had damaged stripping. They were very carefully re-attached with epoxy glue.
Note: The top weather-stripping on the front extension panels are interchangeable between SPG and non-SPG front bumper extensions. The rear SPG bumper extension panels have a different type of top weather-stripping than the non-SPG variant. It is not easily interchangeable.
Details on specialty
hardware:
You’ll need 22 large sheet metal bolts used for attaching the rubber flaps and the 2 SAAB special clips. (This is provided you replace all hardware from the non-spg extension panels) The threaded section should be about 20-25mm long and about 6mm wide shaft.
The black screws pictured above are used for attaching the rubber flaps to the SPG panels themselves. The threaded section should be about 15-20mm long and 4mm across
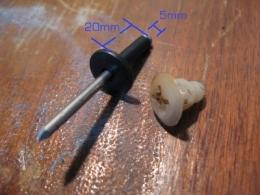
The rivets need to be 5mm (3/16”) in diameter, and have a 20mm long compression shaft. (The part below the base) and have a large head. They don’t need to be black, but the SAAB original rivets were black. You should be able to find rivets of these dimensions at many hardware stores. Use aluminum, not steel rivets.
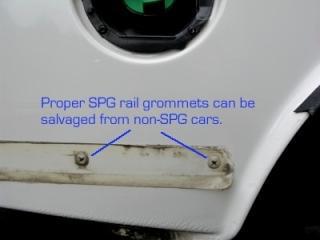
The square grommets are SAAB specific and I’ve heard that they are still available through special order at your SAAB dealership. The part number is 69 11 804. You’ll need 20 if you choose to mount the rails this way. I’ve read about people having some luck finding some locally at hardware and specialty fastener stores. The Original Saab grommets are fitted into a square hole 7mm in diameter. The head is 14mm across and the grommet is 19mm long. These grommets can be found on non-SPG cars if you search your scrap-yards. They are used in the factory mounting of the front and rear bumper extension rails on non-spg cars from 1987-1993. You’ll find 8 per scrap car. Insert a long screw, and pull straight out with a pair of big pliers. The 20 screws for the grommets are of the plain small stainless steel variety.
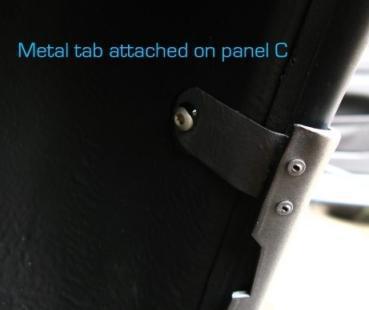
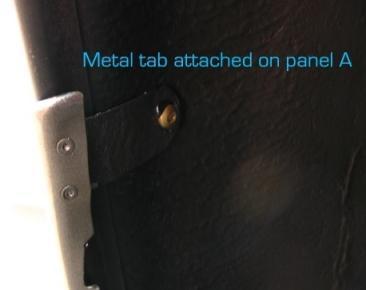
The 4 small screws in the middle of the photo are for the attachment of the metal “tabs” on the top corners of 4 different panels. (Details later) They are only about 10mm long.
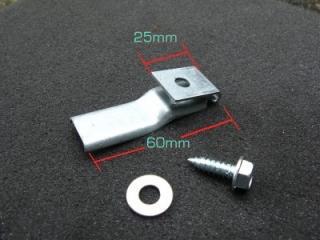
A pair of special SAAB metal clips are used to hold the bottom rearward corner on panels “A”. They are available at your dealership. The part number is 69 21 415. They should cost you about $3.50 each if needed.
A pair of sheet metal screws and washers (2 of each) are also required for the final attachment of panels C. They should be about 25mm long. I like to use torx-head screws for this application. They are not shown in the photo above.
I recommend the use of only stainless steel or “coated” steel hardware to prevent corrosion as much as possible.
Special Saab clip and hardware used on the lower rearward corners of “panels A”
Section B: Tools Required:
In addition to basic screwdrivers and socket-set tools:
Power drill and bits
Riveting tool
Hammer and ~1/8” punch
Center punch
Black silicone sealant or similar
White lithium grease
If you will be drilling
your own rail mounting holes:
A square
A straight edge or yardstick
Good quality rulers.
Fine point marker
Small square file (if you decide to use the plastic grommets)
If you will be making your
own rubber mounting flaps:
Approx 1/8”-1/4” thick rubber sheets.
Ruler
Marker
Tin snips or a heavy-duty exacto knife (like a carpet-cutting knife)
Computer printer for templates
If you will be
refinishing your own panels:
Paint
Medium grit 3M scotch-brite pads
Waterproof sand paper (400 grit)
Body filler (if required)
Section C: Preparation and Paint:
If you won’t be re-painting your panels, skip section C.
I chose to refinish all 10 panels in addition to the front and rear bumpers using a very good, easy to work with, and widely available paint. The paint is made by Dupli-Color and is actually durable wheel paint. The color is “Graphite” The paint stood up very well for years on a previous car, and I would highly recommend it for this application. It applies very nicely and has a satin finish similar to the finish originally used on these panels. It can be found at many local parts stores here in Canada and is often in stock. I believe I’ve seen it in Washington, USA as well, and should be available across North America, and possibly overseas, but I can’t say for sure. I paid $8.49 CDN per can. The paint is pictured below.

Notes about the paint:
There are some really great features about this Dupli-Color wheel-paint. The first is that primer is not required. You can prime if you’d like, but I haven’t in the past, and the adhesion is excellent if the panels are prepped properly. Another benefit is that flaws are very well hidden due to the metallic (almost random) finish and low luster. It’s one of the most forgiving spray-can paints I’ve ever worked with. The paint is very durable after fully cured. It dries very quickly, and is dry to the touch after only approx 10 minutes or less depending on how thick you laid on the paint. It is quite dry after several hours. Theoretically, you could paint and mount a panel in the same day though I would recommend waiting at least 12-18+ hours depending on heat and humidity before mounting.
There are a couple of downsides to this paint as well. I’ve found that sometimes this paint has small globs or soft chunks in the mixture. This will cause small raised spots on the finish. This can be prevented by very thoroughly shaking the cans for at least 3-4 minutes each then let the cans sit for several hours or overnight, then shaking again for a minute before use. The globs will dissolve with this process and you should have a spot-free finish. You may not have any problems at all. It likely depends on how long the paint has been sitting since manufacture. Test out the paint before you use it on a panel. This paint is also quite heavy on the overspray. After painting 10 panels and 2 bumpers everything in your “painting room” will be covered in a dark film. I use a large fan to blow air and over-spray out of the area.
Preparation:
Remove all rubber flaps and speed nuts from the panels if they are still attached.
Clean the panels very well with dish soap and water with the use of a medium-grit 3M scotch-brite pad to deep clean and lightly rough the finish. The cleaner the panel, then less specks you’ll find in the finish and better adhesion of the paint to the surface. Inspect the surfaces for any deep scratches or gouges you may want to repair with body filler.
After the panels are clean, wet-sand the faces with 400-grit waterproof sandpaper. Thoroughly clean the panels again. (I use an old car-wash mitt) Then dry the panels with lint-free or low-lint towels, etc.
Before painting, it’s necessary to set up as clean of a “paint booth” as possible while still being easy and realistic. I used my tool shed. The floor and workbench was vacuumed, the ceiling was covered in plastic and some things were covered in paper to protect from over-spray. You can try and paint in a closed environment, but you’ll likely gas yourself even with a facemask. I left the door open to the yard and painted on a very calm day. A fan was used to pull fumes and over-spray out of the shed.
Painting:
Everyone has their own method and style to painting with a spray can; I’ll just include what works best for me with this setup. Remember to have a clean environment and to be patient.
Using a brush fitting, I vacuumed the surface of the panel to remove most of the dust and specks. You can use compressed air, but it will tend to stir up dust from other areas. Again, this paint is quite forgiving and concealing, so you don’t have to go to extreme measures in your cleanliness.
I start with the small panels to get a feel for the job. I paint the very bottom of the panels first and wait about 20 minutes. The overspray on the top portion of the panel can now be wiped and vacuumed away if necessary.
I hold the can about 30cm (1’) away and spray only in cross sweeping motions. Never stop or change direction while spring over the face of the panel. You want to distribute the paint as evenly as possible. The first light coat will look like stripes across the panel. I like to make a couple of very light coats before I place the final heavier coat on the panel. The panel is then left alone for 15-20 minutes until the paint is no longer tacky then put out in the sun to dry. Again, this is what works for me. You’ll likely find your own method.
The result is surprisingly excellent.

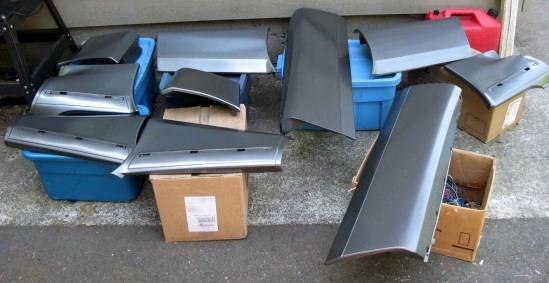
If you make a mistake, leave the panel to dry for several hours. Proceed to wet-sand the panel to restore the finish so you can try again. I used almost 4 cans of paint and repainted 2 panels due to minor dust issues.
Section D: Mounting the rails
How you complete this section is highly dependant on if you have a car with pre-drilled holes or not. If you car does not, the exact locations of the holes required can be seen in the photos below. All measurements are from the center of the hole to the edge of the body panel’s face.
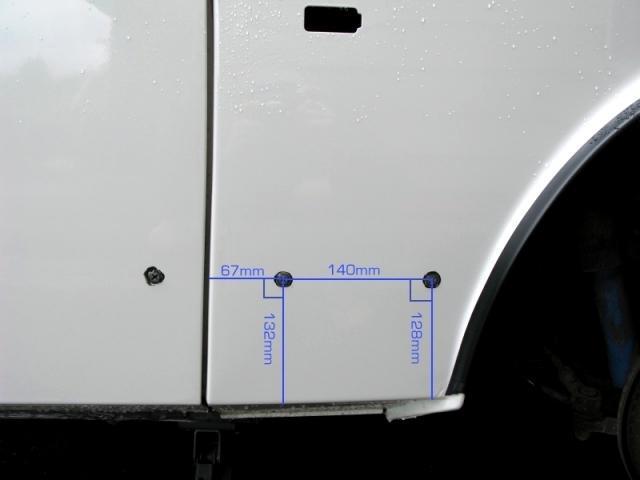
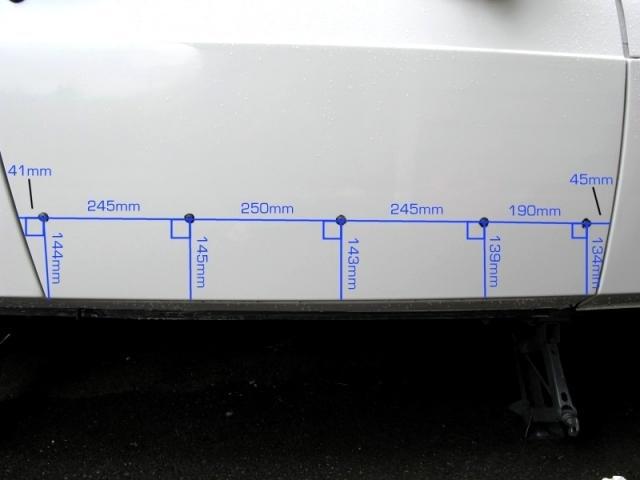
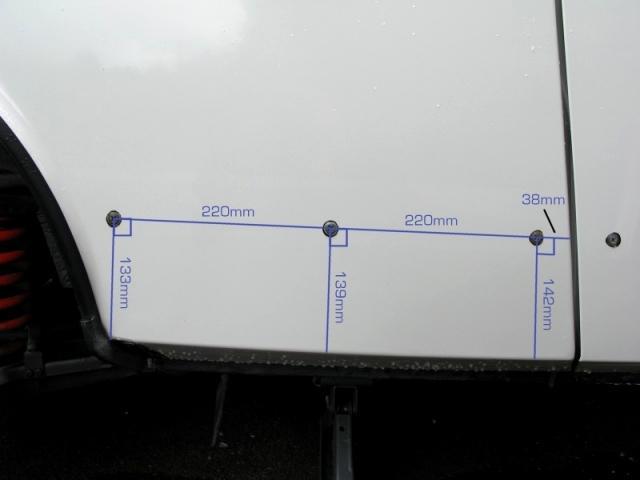
The measurements are exact as possible and taken from a car factory pre-drilled for the kit. The measurements are an exact mirror image on the left side of the car.
After you’ve marked the spots for the holes, you’ll need to gently center punch the points for drilling. You now need to either drill a hole for a sheet metal screw or file out a square hole for fitment of the plastic grommets. If you would like to file out a square hole for the proper plastic grommets, start with small pilot holes (approx 1/8”) then drill as close to 7mm holes as possible without going over 7mm. Then use a small square file to square off the corners of the holes. It’s best to use touch up paint or thick primer/rust paint on the bare metal after the filing is done. This is to cut down of future corrosion.
If you don’t want to use the plastic grommets, gently center punch and drill a small hole for the sheet metal screws that will hold the rail on.
Whether you choose to install the rails with use of the grommets or by a sheet metal screw only, I recommend using a sealer around the hole to keep moisture out and corrosion under control. I use a flexible sealant product called “Automotive Goop” You can use RTV sealer or silicone, etc. Rust loves to grow under SPG panels.
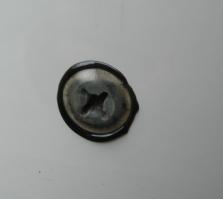
Sealed grommet:
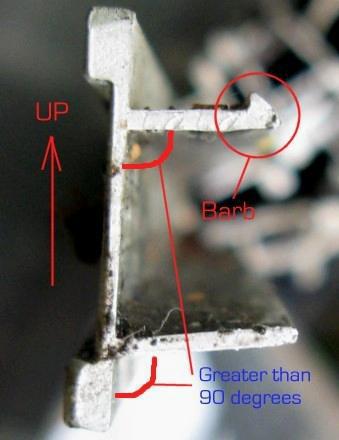
Important! Panels A and C have interchangeable rails (left and right) The door rails are left and right specific. (Due to the mounting holes) Ensure that you mount the rails to the car with the small “barbed” clip on the top. You’ll also see the 2 parts of the rail that extend outwards are on a slight angle upwards. They are supposed to be this way, and should NOT be made perpendicular to the base. The proper distance and angle between these 2 extended out parts is crucial for proper mating of the 2 rails and is a surprisingly exact dimension. It is very difficult to mount panels properly using damaged rails. I will briefly touch on how to quickly attach some panels without the use of rails at all.
Aluminum rail side view:
The rail buffer strips:
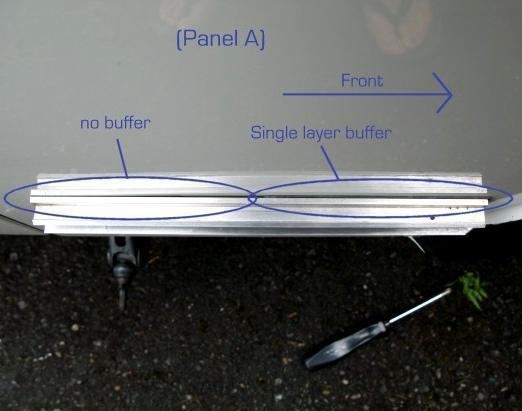
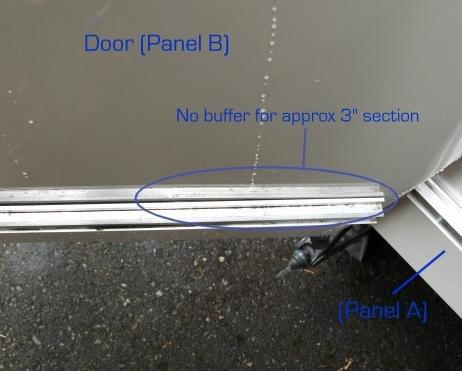
The long back plastic strips that are normally installed behind the aluminum rails on the “center 6” panels can be installed in different positions and combinations to provide the proper gap for the weather-stripping at the top of the panel. Panels C have buffer strips which are twice as thick as the other strips. I used these as normal behind the Panel C rails. Panels A and C are pictured below with the best setup on my car. It may be similar on your setup, but it may vary. You may need to experiment with either single buffer, doubled-up buffer or no buffer when it comes to actually fitting the panels to the rails. The photos below show the best orientation for one side of my setup. SPG panels vary in warpage and weathering which generally cause the differences in buffer setup from car to car. If you don’t have the official SAAB buffers, you can use other materials without trouble. The original buffers are 1.5mm thick on panels A and B, and are 3mm thick on panels C. In areas with “no buffer” I used black trim tape simply to prevent the aluminum from contacting the paint.
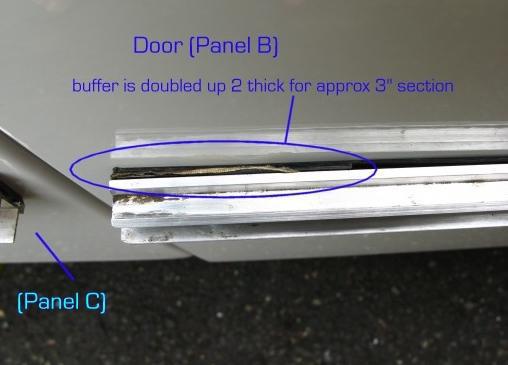
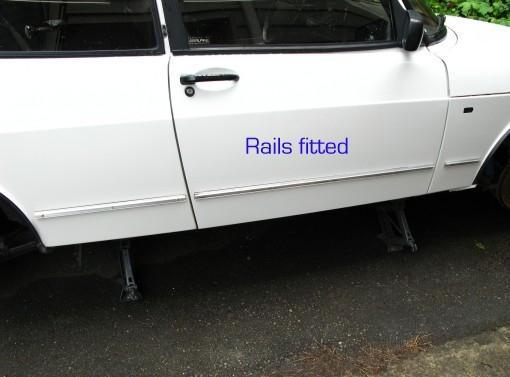
Mount the 6 rails to the car using the small 20 screws. You’ll notice the aluminum rails have large holes for the screws. Try to position the rail with the screw in the center of the aluminum hole initially. The rails can then be adjusted either up or down as needed for alignment.
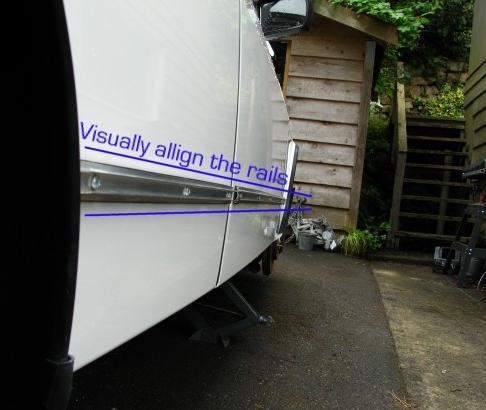
Align the rails as best you can down the length of the car. The panels won’t always line up even if the rails do, but it’s a good place to start.
Section E: Fitting the Center 6
Panels on the rails:
This article covers the
installation of the 3 center panels on the right side of the car only. Follow
the same process for the left side.
I recommend mounting all
“6 center” panels on their rails first and installing all supplementary
hardware and flaps afterwards.
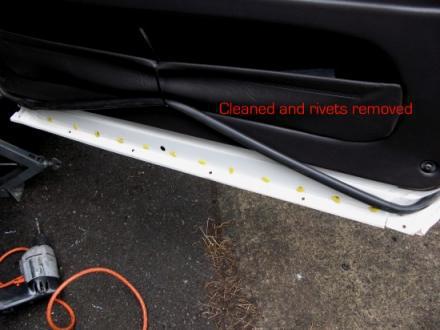
Before fitting the panels, the old rivets at the bottoms of the doors must be removed. These rivets only hold on the rubber sealing strip. (You will need to keep these strips for re-installation) It’s not required, but I pulled up the bottom portion of the door seal to clean in behind and inspect for rust. You can leave this in place if you’d like.
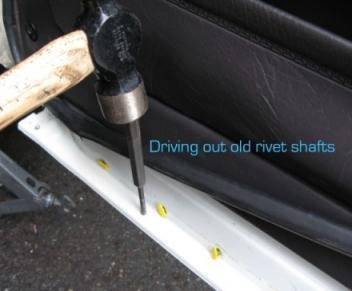
The tops of the old rivets must be drilled off for removal. A 9/32” drill bit works well. Only drill until the head becomes loose from the rest of the rivet. After all 12 rivet heads are removed (6 on each door) the remainder of the rivet must be driven out with a punch. I used a 1/8” punch and hammer. You may have to hit it fairly hard to get the rest of the rivet out, but it’ll break loose.
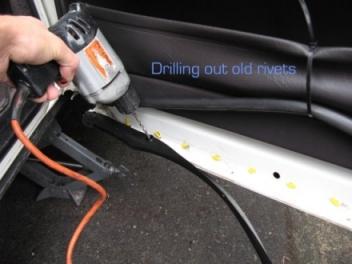
Nice and clean and ready for new rivets:
Installing panels “B”:
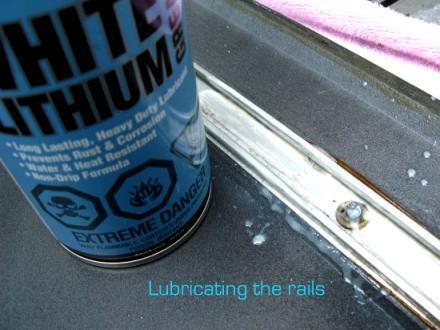
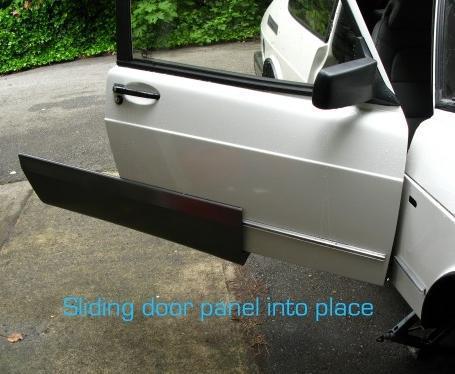
I started with the installation of the door panels, but you can start with any of the 3 panels. This is where things start to get hairy. The door panel is the easiest to install. This is because the link between the rail on the car and the rail in the panel can easily be made by sliding the panel on. It doesn’t need to be “snapped” into place. First, I highly recommend lubricating both the rail on the car and on the panel with white lithium grease to ease in sliding. Open the door, Line up the panel at the edge and slide the 2 mating rails together. Push it on about a foot. Then use soapy water to lightly wet the area of the paintwork directly on the door where the panel’s top weather-stripping will slide for a smooth install. Push the door panel on the rest of the way. Make the gap at each end about the same. DO NOT rivet the bottoms on the door panels in place yet, that will be covered later.
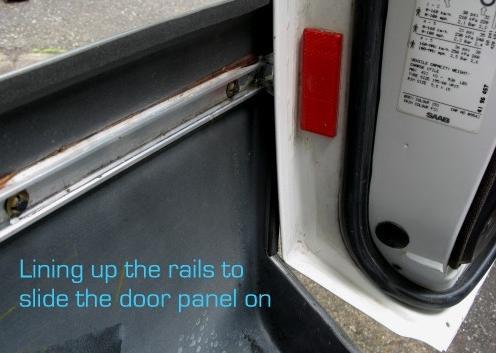
Ok, the straightforward part is over. The rest of this section is fairly subjective and covers multiple ways of getting the panels on. Ultimately, panels A and C should to be “popped” into place. (There are alternate methods that will also be covered)
It doesn’t matter what panel you choose to install next. The article will start with panel A.
Installing panels “A”
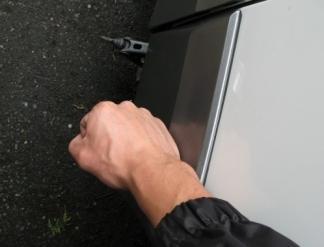
Ensure the rail isn’t bent at the ends. Gently straighten it out if required. Basically, you want to place the 2 mating rails directly against each other and “pop” them together into place. This can be done with a quite firm hit with the base of your hand over the rail area. It is often NOT an easy task unless you are working with all brand new materials. (Extremely unlikely) Personally, on my setup, 2 of the 4 panels required to be “popped” into place went on without much difficulty, and 2 were extremely difficult. It’s best to start at one end then work your way across with several bumps with your hand. Again, this may be done fairly easily, or it can be a nightmare. When it’s mated correctly, it’s attached quite strongly.
Firmly knocking the panel (popping rails together)
If you just can’t get it popped into place, there are other ways of getting the panels on. 2 of which are covered in this article.
Alternate method 1:
The first alternate method is to slide the panel on similar to the door panel, but some slight modification of the panel A must be done. To install panel A this way:
1. Remove the door SPG panel (Panel B) and rail.
2. Look at the lip that fits over the edge of the front wheel well on Panel A. Part of this lip on the panel must be cut away to fit over the wheel arch when sliding it into place. Concentrating on the top half of the panel, cut away about half of the “lip” but DO NOT remove the metal tab that’s riveted to the top corner. The use of a Dremmel rotary tool works best with a grinding stone or cutting wheel. Cut as close as you can to the tiny rivets holding the metal “tab” on without compromising too much of the rivet’s strength.
3. Use white lithium grease on both the rail on the car and the rail on the inside of the panel. With the door closed, slide panel A on in the same manner used for the door panel. When you reach the wheel arch, you must pull and bend the plastic panel over the arch and into the wheel well. The panels aren’t invincible, but are fairly flexible. The panel should now be on the rail in place.
If you can’t get the lip over the wheel arch you need to trim away more material. Another trick you can use is to mount the panel on a “half” or “two-thirds” rail but cutting the aluminum rail down in length. This will assist in the flexing of the panel’s lip over the wheel arch.
Alternate method 2:
This alternate method 2 is fairly crude and not as aesthetically pleasing as the other methods but it’s quick and easy. It involves abandoning the rail and buffer completely and using a single small counter-sunk screw in the upper rearward corner of the panel. If the counter-sunk-headed screw is quite small, and painted to match the panel, it would be fairly well concealed. The positioning is in the photo below. This one tiny screw can replace the rail entirely due to the multitude of other hardware later used to complete the installation of this panel A.
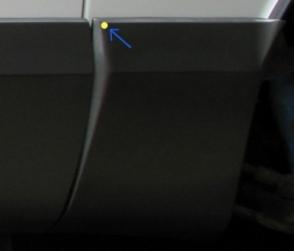
If the top of the panel is too tight or if there is too much clearance between the panel and the body of the car, add or remove black plastic buffer strips under the aluminum rail to suit. You may have to install and remove the panel several times with different combinations of buffers to get it looking great.
Installing panels “C”
These 2 panels are of equal difficulty and similar procedure as the above “panels A” installation.
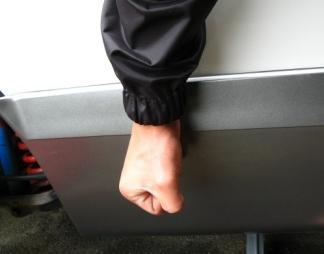
Panel C can be popped into place like Panel A, but it is easier to see if the rails are lined up first. You can look down the side with the door open to ensure they are correctly positioned prior to “popping” them into place. Again, it can be fairly straightforward or extremely difficult to mount this way. Start at one end and hit the panel multiple times moving across to the other end.
The alternate methods of installation available for Panel A are also applicable for panel C.
Alternate method 1:
This method is virtually identical except you don’t have to remove the door panel “B” first.
Alternate method 2:
This method also includes the complete discard of panel C’s rail and buffer. Instead of a visible small screw in the upper corner, 2 small holes are drilled (one in the forward edge of the panel and one in the door jamb of the car) A small plastic or aluminum brace is riveted or screwed in place to secure this corner of the panel. This one small relatively hidden brace can replace the rail entirely due to the multitude of other hardware later used to complete the installation of this panel C.
I needed to use alternate method 2 of install on the right side panel C on my own vehicle. It is quite well concealed after it is painted to match. A photo can be seen below.
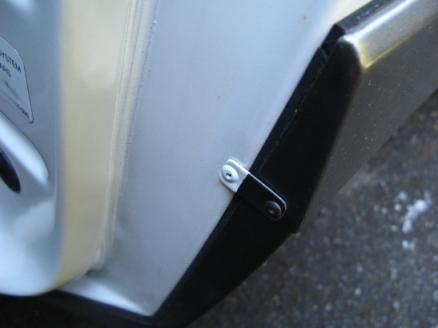
If the top of the panel is too tight or if there is too much clearance between the panel and the body of the car, add or remove black plastic buffer strips under the aluminum rail to suit. You may have to install and remove the panel several times with different combinations of buffers to get it looking great.
Adjustments:
You should now be able to see if all the top edges of the panels line up. If they don’t, you’ll need to remove the panels from the rails and adjust the rails up or down accordingly. You may also need to remove the rails and enlarge their holes to give you enough play to find the right position. It’s a lot of trial and error and general tweaking. Take the time to align it properly now. If you don’t, you’ll forever be staring at that misaligned panel every time you get into your car.
Section F: Installing rubber
mounting flaps and retaining tabs.
4 of the “6 center” panels are fitted against the wheel arches of the car. These 4 panels (“A” and “C”) each use both a rubber “flap” or “sheet” and a single screw through a thin metal retaining tab. Holes must be drilled directly into the wheel well wall to accomplish this. Both the front and rear extension panels also utilize a special flap for installation.
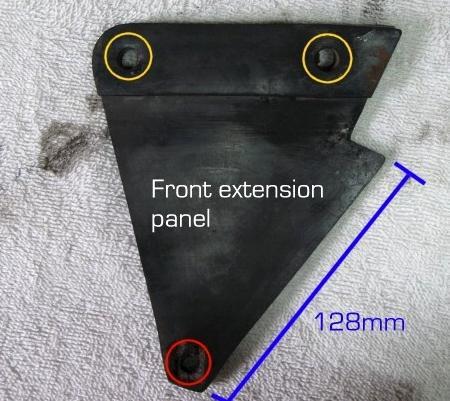
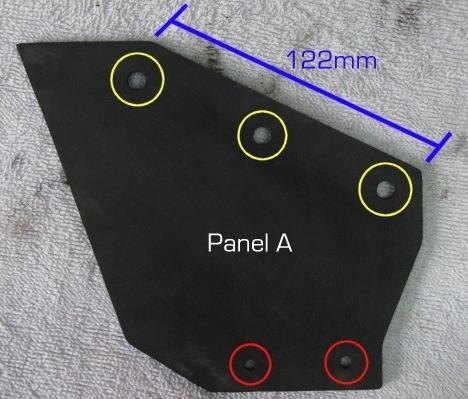
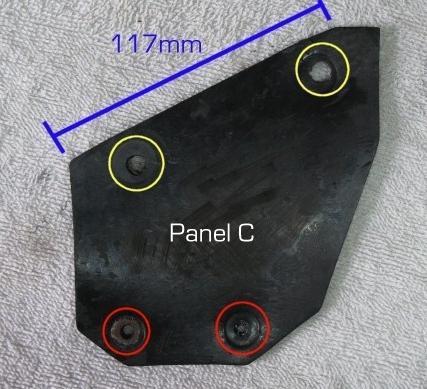
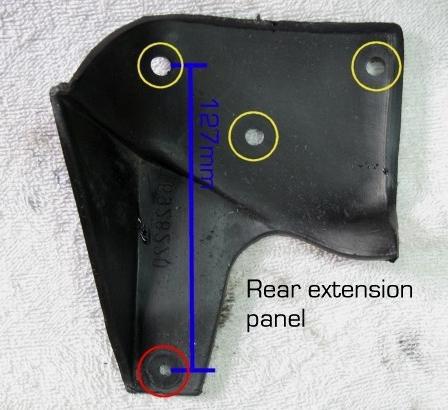
I have prepared photos suitable for templates if you need to fabricate your own mounting flaps. Simply resize the image or print setup accordingly so the measurement on the image is the actual measurement on your computer printout. Cut out the paper flap and trace onto rubber 1/8” to 1/4” thick. Large truck mud-flaps are an excellent source for the rubber required. Use either a leather/rubber punch set to cut the holes (best method) or drill them with a standard power drill.
Note: The flaps required for the rear extension panels are originally of a molded plastic design. They can be replaced by a flap of the same material as the other panels if required. They are still available through SAAB, but they are around $60 each. As you’ll see in the photo, the front extension panel flaps are double thick at the top to slightly assist in a better fit to the wheel well, but it’s not completely necessary to double up the rubber here. It will work fine as a single layer if you are fabricating your own flaps.
All the flaps pictured are for the right side of the car, and they are pictured in the same position that you would see them installed on the right side of the car. The left side’s flaps are an exact mirror image. The holes circled in RED are where the flap screws to the panel. The holes circled in YELLOW are where the flap is bolted to the inside of the wheel well.
Installing speed-nuts and
mounting flaps to panels:
Install the 12 speed nuts onto the bottoms of panels A, C, front extensions and the rear extensions. The red-circled holes on the flaps above are where a screw will be used to hold the flap to the SPG panel.
Now, mount the flaps onto the panels mentioned above using the 12 “screws for speed nuts” seen way up in section A of the article. All the flaps should now be installed and hanging freely inside the wheel wells.
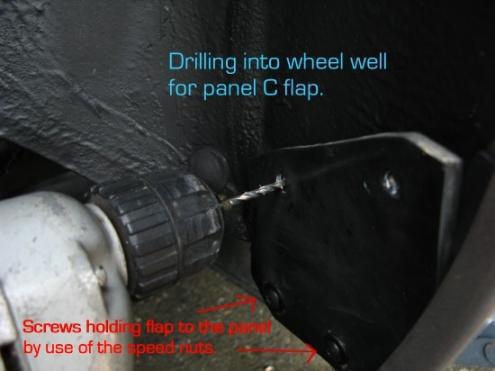
You are now ready to drill the holes in the wheel wells of the car for the yellow-circled holes on the flaps above. It doesn’t matter which order you choose. You will need to drill for Panels A and C only. The rear extension and the front extension SPG panels utilize the holes from the non-SPG extensions, and don’t need to be drilled.
I highly recommend using a type of sealant around each of the drilled holes into the car body before you bolt the flap down. (To keep moisture out and cut down on corrosion.)
Panel C drilling and flap
installation:
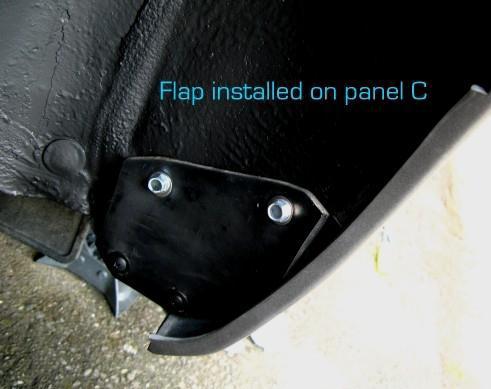
Gently apply pressure to the bottom of the panel holding it against the car. Using the rubber flap as a template, center punch the 2 places where you will need to install bolts into the wheel well. Proceed to drill holes here. (Choose the right drill bit for the size of bolts you purchased.) Bolt down the flap into the wheel well. It’s best to use a washer with the bolt.
Panel A drilling and flap
installation:
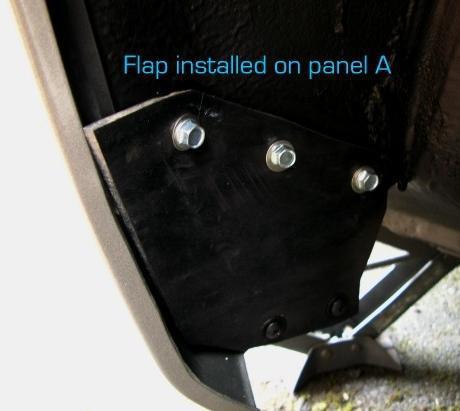
Very similar to Panel C. Gently apply pressure to the bottom of the panel holding it against the car. Using the rubber flap as a template, center punch the 3 places where you will need to install bolts into the wheel well. Proceed to drill holes here. (Choose the right drill bit for the size of bolts you purchased.) Bolt down the flap into the wheel well. It’s best to use a washer with the bolt.
Fastening thin metal
“tabs” on panels A and C.
Now is a good time to fasten the small thin metal tabs into the wheel wells on panels A and C. These tabs secure the top corner of the SPG panel in place. A single small hole must be drilled in each of the wheel wells.
If some of your panels are missing these tabs or are badly rusted, you can make your own without much difficulty. When you rivet the tabs to the top corners of the panels, ensure you use really tiny rivets. There isn’t much clearance between the panels and the black trim fitted to the car’s body that is around the edges of the wheel arches.
Ensure the tab is nicely bent around the inside of the wheel well. Hold the panel against the body of the car at the top corner. Apply the right amount of pressure so that the weather-stripping on the top edge of the panel is evenly compressed. Hold the tab against the inside of the wheel well tightly and mark the holes position. Center punch, and drill a small hole for a single screw.
I like to use original Saab torx screws here. I also recommend adding a bit of sealant around the hole to keep moisture out.
Section G: The final securing and
riveting of panels A, B, and C.
You are now nearly done the installation for the “Center 6” panels. You have only a few more tasks to complete.
Finishing panel A:
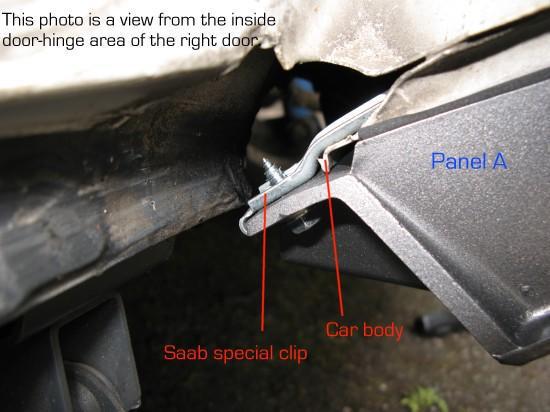
The last piece of hardware required for panel A is the Saab specific clip as pictured way back in Section A. One clip is used on each side of the car to hold down the bottom rearward corner of panel A. It is possible to manufacture your own clip, but the Saab one is very strong and designed for the job. They are still available through your dealership, and I would highly recommend using the correct part, as it’s less than $7 for the pair. The SAAB part number is 69 21 415 and is the same for left and right.
A bolt the same as the ones used to secure the flaps to the body of the car works well for this clip. The clip is bolted and clamped to the corner of panel A. The clip is held against an area of the car’s body under the fender. No holes need to be drilled in the car. The photos below best describe the fitment.
You have now finished the installation of panels A. They should be now very securely attached!
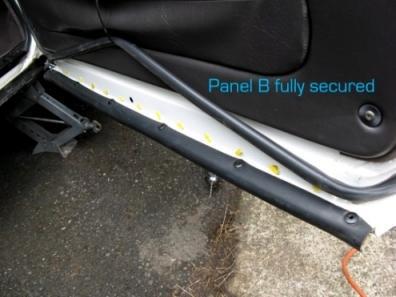
Finishing panel B:
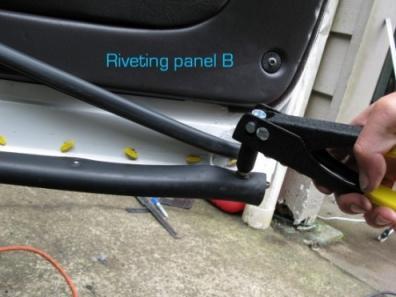
To complete the installation of the large door panels (panel B) they must be riveted to the bottom of the door with the 12 rivets shown back in Section A: Materials.
Note: MAKE SURE you remember to add the rubber sealing strips that run the length of the doors under the rivet heads. (You removed them earlier)
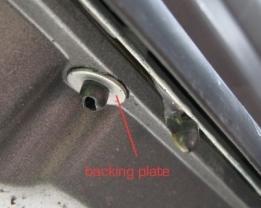
The rivets used have a 20mm long compression shaft and are 5mm in diameter. You will need 6 per door. You will also need “rivet backing plates” which are simply a specialized aluminum washer used on the end of the rivet. This provides a much better hold against the panel. I used backing plates slightly larger than the ones originally pictured in Section A: Materials.
First rivet the far corners of the panel. (Don’t forget to add the rubber sealing strip and the backing plate) You may have the apply significant pressure to the outside of the panel to get the holes lined up to insert a rivet, but you shouldn’t have too much trouble. Work your way from the outside corners in until all 6 rivets have been placed.
Finishing panel C:
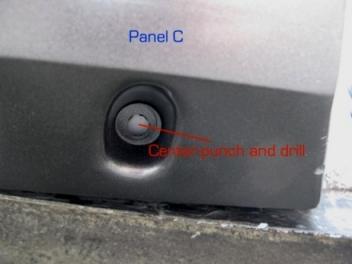
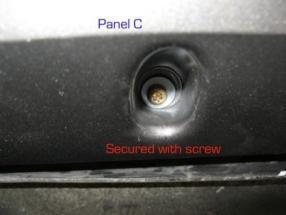
You may have noticed a hole at the bottom front corner of Panels C. This hole is for the final securing screw on this panel. It holds the bottom corner of the panel against the car. You need one screw and washer for each side of the car. I used a torx-head screw approximately 25mm long and a stainless steel washer. (Not shown in Section A: Materials)
Hold the lower section of the panel C firmly against the body of the car. Mark and center punch a place to drill a small hole. Use some sealant around the hole and on the threads of the screw. (Rust easily starts at hidden, lower sections of the car’s body like this)
Secure the panel with the single screw and washer.
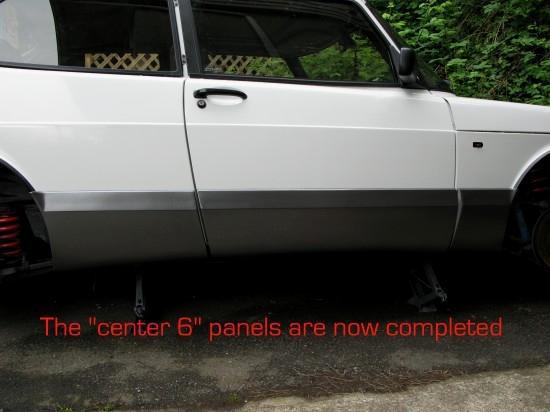
The “Center 6” panels are now fully installed and secured.
Particularly panels B and C should now be nicely sealed up on the ends with use of the weather-stripping you added earlier. This weather-stripping is primarily used for aesthetics and protection of the car’s paint. Some sections you may need to double-up the weather-stripping to fill a larger gap. It seems every setup is different. As far as sealing goes around the panels, you’re best not to try and seal it all up completely. Water will get in regardless. It’s better to ensure you are allowing water the chance to get out. This is why there are no seals at the bottoms of the panels.
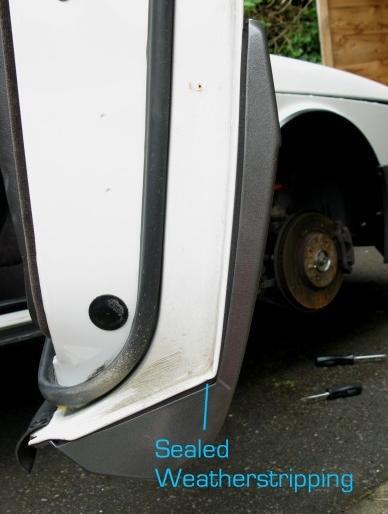
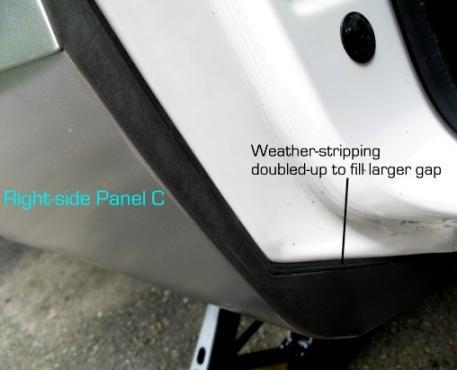
You have now completed the most difficult sections of the article.
Section H: Fitting the extensions and front spoiler
lip:
Like mentioned way back in the SPG kit intro, the installation of the SPG extension panels are fairly similar to their non-SPG variants. There are a few differences:
1. The rubber/plastic flaps are different
2. The tiny screw that holds the top corner to the edge of the wheel well is at a slightly different height.
Locking extension panels
in place on the rails:
The rails on which the extension panels sit on are identical to the non-SPG type. To mount the spg panels on these rails, you must line up the rail on the backside of the panel with the rail mounted to the car. There are 2 small “pegs” that fit into a groove. The panel is then pushed towards the bumper about 20mm to lock it into place. It can be tricky to get it lined up with the bumper correctly. The panel must fit into several “channels” on the edge of the front and rear bumper covers. You should have it mounted without too much difficulty after a few tries. The front and rear extension panel’s top weather-stripping should be against the body of the car. Make sure the plastic edge and clip are lined up for the small screw on the top corner before locking the panel into place (details below)
Mounting front and rear
extension panel rubber flaps:
You need to have on hand or fabricate the proper rear extension rubber flaps for installation. For my setup, I only had one original rear extension flap on hand. I made the other side out of an extra mid-body mud flap found on C900 cars.
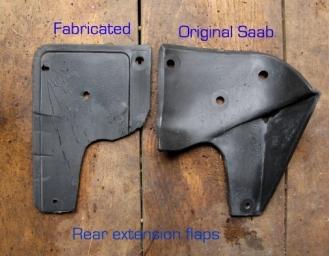
The front extension flaps are also different than the non-SPG type. You can see their sizes and dimensions back in Section F. However, the holes into the body of the car for both the SPG and non-SPG flaps are in the same place, so no drilling is required.
Attach the flaps using sealant around the holes into the body as pictured below.
Just to be technical, the photo of the front extension flap installed on the right side of the car is actually the left flap. They have a raised top section that should be against the body of the car. (Realistically, it doesn’t make much of a difference, but there is a right and wrong way of installation)
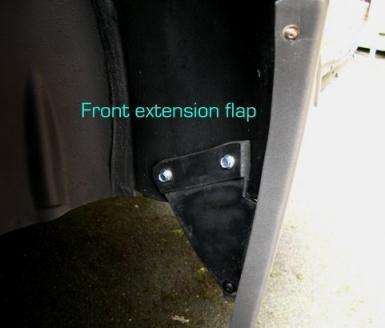
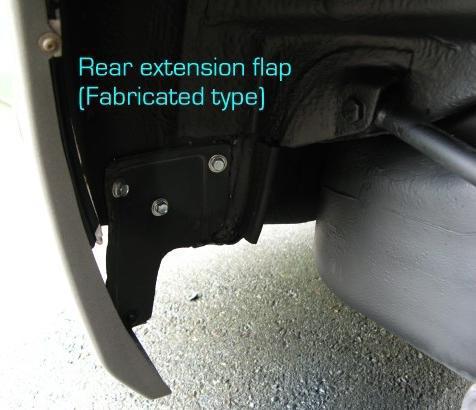
Attaching extension panel
small retaining screws:
As you can see in the upper portion of the 2 photos above, there is a tiny screw on the inside edge of the upper corner on each of the extension panels. The same screws and clips are used on both SPG and non-SPG extension panels. The only difference is that you need to move the body-mounted clip upwards about 10-20mm to line up the holes. A small section of black fender trim will likely need to be cut off. The clip can then simply be slid up inline with the hole on the panel. All 4 extension panels will need this adjustment to some degree. (Some more than others)
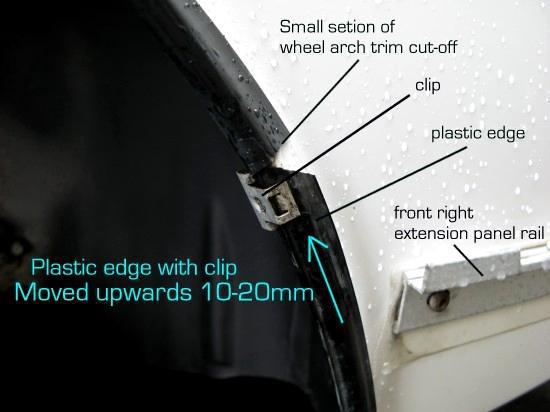
Finishing the extension
panels install:
The front extension panel uses a small finely threaded metric screw at the bottom front corner. The screw holds the bottom corner of the panel and the end of the front lip spoiler in place against the front bumper lower valence. You can use the same screw that held the non-SPG front extension panel in place.
The rear extension panels have a single screw at the rear-most corner to attach to the bumper cover. The same speed-nuts and screws can be used from the non-SPG rear extension panels
Installing the front
spoiler lip:
The lower valence under the front bumper of your 1987-1993 900 is already prepared for the addition of the front lip spoiler if you don’t already have one. It is simply attached using approximately 10 finely threaded metric screws. (The “nut” for these screws is integrated into the valence already) The screws are the same as the one that held your non-SPG front bumper extension panel in place on the lower front corner. Use this screw to find a new set at your hardware store. Installation is as simple as screwing the lip spoiler on. There are channels at the ends of the lip spoiler that fit into the end of the SPG front bumper extension panels. The ends of the spoiler share a screw with the front extension panels to hold everything to the front bumper’s lower valence.
You should now have all 4
extension panels and front lip spoiler in place.
You have officially
completed the 10-panel install.
Overall I was very happy with the way the project turned out this time around. It was great to work on a very nearly rust-free car. (My last SPG was a rust-bucket) I used all the rails except one. I simply could not get panel C to co-operate on the left side without ditching the rail all together. I used the “alternate method 2” utilizing a small brace on the inside of the doorjamb to finish the job. In addition to painting the bumpers the matching color, I re-finished the originally chrome décor strips black on all extension panels and on the front and rear bumpers. I also installed a set of original SPG fender flares to complete the look.
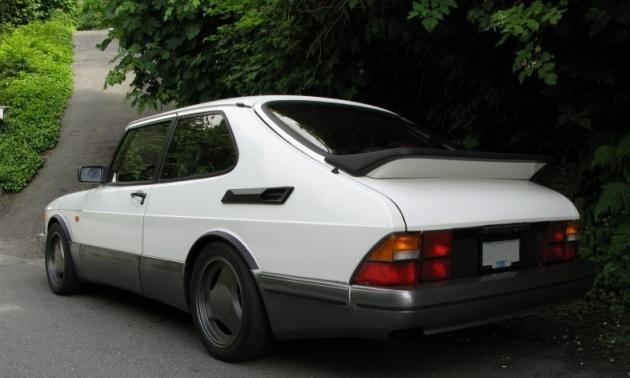
Congratulations! You’ve
completed one of the most rewarding additions to your Classic 900.
SAAB Part numbers:
Panel A rubber flaps 92 85 875
Panel C rubber flaps 92 85 867
Front SPG left extension
rubber flap 69 15 094
Front SPG right extension
rubber flap 69 28 303
Rear SPG left extension
plastic flap 69 28 220
Rear SPG right extension
plastic flap 69 28 238
Plastic rail grommets 69 11 804
Panel B rivets
69 16 977
Panel A specialized
clips 69
21 415
Notes:
This document may be distributed for informational purposes only and must be kept together in its complete entirety. All work on your car is done at your own risk. You may not sell or use this document for any sort of monetary gain. This article’s sole purpose is to support to the worldwide SAAB C900 community and to assist SAAB enthusiasts interested in maintaining and improving their vehicles.
All text and photographs are copyright Rob Marsh 2007